Introduction to MySQL
MySQL is an SQL-based (Structured Query Language) Relational Database Management System. Data Warehousing and E-Commerce, are just a few of the uses for the application. However, the most common application is a Web Database. It can hold anything from a single piece of data to a whole inventory of available products for an online store. It is possible to develop websites that interact in real-time with a MySQL Database to quickly display information to a website user using a scripting language such as PHP or Perl.
Introduction to SQL Server

SQL Server, in simple terms, is a Relational Database Management System (RDBMS) from Microsoft. It supports a wide range of Transaction Processing, Business Intelligence, and Analytics applications. Along with Oracle Database and IBM’s DB2, SQL Server is one of the three Market-leading Database technologies. SQL Server, like other RDBMS software, is based on SQL, a standard programming language for working with relational Databases. It is also linked to Microsoft’s Transact-SQL (T-SQL), which adds a set of proprietary programming features to SQL.
Methods to Migrate MySQL to SQL Server
Now, that you know a little about MySQL and SQL Server, let’s walk through the different methods you can use to migrate MySQL to SQL Server. Following are the 2 methods that you can use:
- Method 1: Migrate MySQL Tables to SQL Server using SSMA (SQL Server Migration Assistant)
- Method 2: Migrate MySQL to SQL Server using SSIS (SQL Server Integration Services)
Before proceeding any further, there are a couple of prerequisites for both migration techniques. You need to ensure that you have all the following prerequisites before moving on to any of the above mentioned 2 methods:
- SQL Server with admin privileges (2016 or above version).
- MySQL with admin privileges installed in your device (5.7 or above version).
- SQL Server Migration Assistant (SSMA) along with .NET Framework for the first method (7.3 or above version).
- Ensure that SQL Server Agent Service (SSAS) is there in your device.
- SQL Server Data Tools (SSDT) and SQL Server Integration Services (SSIS) are up and running on your device.
Now, let’s walk through the above-mentioned methods, one by one.
Method 1: Migrate MySQL Tables to SQL Server using SSMA
SQL Server Migration Assistant or SSMA, as the name suggests, is an automated migration tool from Microsoft. It allows you to migrate data from MySQL Databases to SQL Server, Azure SDMI (SQL Database Managed Instance), and Azure SQL Database. Follow the steps given below to migrate MySQL to SQL Server using SSMA:
- Step 1: Initiate a Local Instance in MySQL
- Step 2: Create a New Database
- Step 3: Create a New Table
- Step 4: Create a New Project in SSMA
- Step 5: Connect to MySQL Server and Migrate the MySQL Tables
Step 1: Initiate a Local Instance in MySQL
Search for the MySQL Workbench application (where you installed MySQL) and open it. Click on the local instance to connect to MySQL Server. You will need to specify the password that you must have created during the installation process of MySQL.
Step 2: Create a New Database
For the toolbar, click on the “New Database” button as shown in the image below.
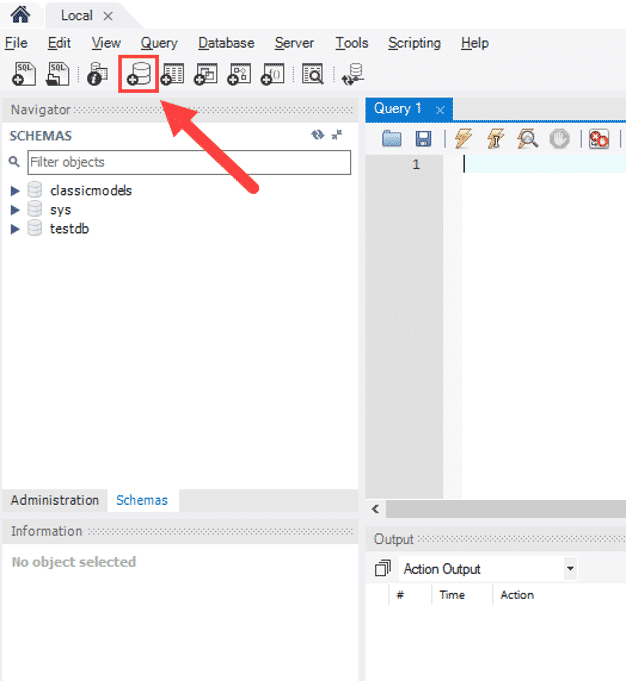
This will lead you to a fresh window that will ask for the Database name. Enter a name for the Database you are creating. You can now click the “Apply” button.
NOTE: Change the character set and collation (if necessary)
There are a few alternative methods to create a new database in MySQL. Click here to know more.
Step 3: Create a New Table
You will now see a new Database (that you created in the last step) has been added under the Schema list in the left panel. Double click on the Database and then click on the “Create New Table” icon in the toolbar. For the ease of this article, let’s use the following code to create a new table named “Details”. However, you can create any other table as per your requirements.
create table details
(
id int,
first_name char(30),
last_name char(30)
);
insert into details values
(1,’Howard’,’Stark’);
insert into details values
(2,’Tony’,’Stark’);
Copy and paste the following code and then click on the “Execute” icon. This will create a new table named “Details” under your Database. Similarly, create 2 more tables.
Step 4: Create a New Project in SSMA
Open the SQL Server Migration Assistant (SSMA) and click on the “New Project” option as shown in the image below.

This will lead you to a fresh window. Here you will need to add details like Project Name, and Migrate To. Give the necessary information and click on the “Create” button. This will successfully create a new project for you.
Step 5: Connect to MySQL Server and Migrate the MySQL Tables
Follow the steps given below to link with MySQL Server and migrate the MySQL Tables:
- Click on the “Connect to MySQL” icon on the toolbar as shown in the image below.

- You will now need to feed the following parameters: Server Name, User Name, Password, and Server Port. Specify the parameters and click on the “Connect” button.
- This will give you access to all your MySQL Databases. Select the previously created database and then click on the “Connect to SQL Server” icon.
- This will open up a new window. Once you have checked all the parameters, Click the “Connect” button.
- You will now be able to see the SQL Server Databases. Choose the specific tables you want to export and click on the “Convert Schema” icon as shown in the image below.
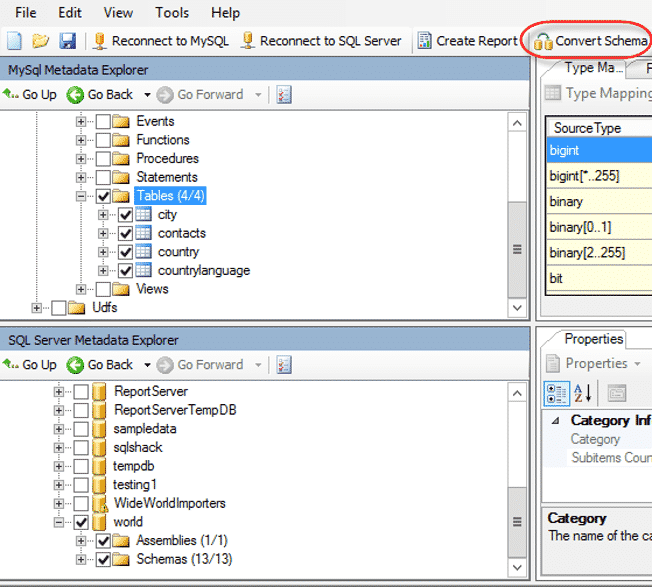
Now, there are chances that you might notice some unhandled exceptions during the process. This majorly happens when any of the columns in your tables have the data type “ENUM”. ENUM is not compatible with SQL Server for migration. In cases like this, you need to migrate those specific tables using SSIS, which is elaborated on later in this article.
Select the tables that were not throwing any exceptions. Once done, select Synchronize with Database > OK > Migrate Data icon. This will successfully migrate MySQL Tables to SQL Server.
Method 2: Migrate MySQL Tables to SQL Server using SSIS
SQL Server Integration Services or popularly known as SSIS is a platform for performing Enterprise-level Data Integration and Transformation by Microsoft. Although the method is a little trickier than migrating MySQL Tables to SQL Server using SSMA, it is very useful when the table that you want to migrate has a column of data type ENUM. Follow the steps given below to migrate MySQL to SQL Server using SSIS:
Step 1: Create a New SQL Server Integration Project
In SSDT (SQL Server Data Tools), click on File > New Project to create a new SQL Server Integration Project.
Step 2: Create an ADO.NET Connection
Follow the steps below to create an ADO.NET Connection:
- In the SSIS project that you created in the previous step, drag and drop the Data Flow Task to the design pane as shown in the image below.
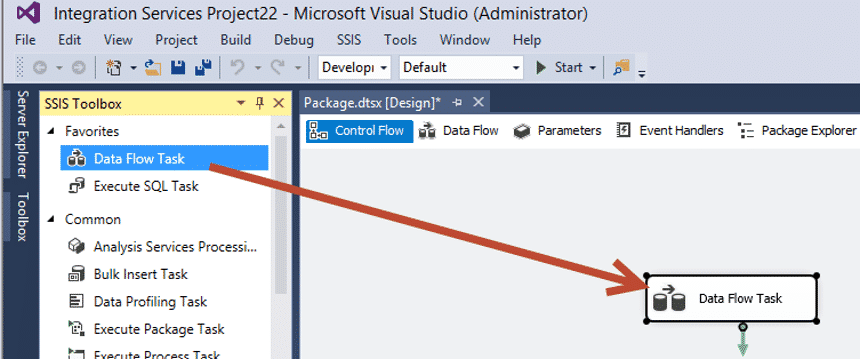
- You now hace click(Double) on the Data Flow Task that you dragged in the last step and then drag and drop the ADO NET Source in the design pane.
- Double click on the ADO NET Source.
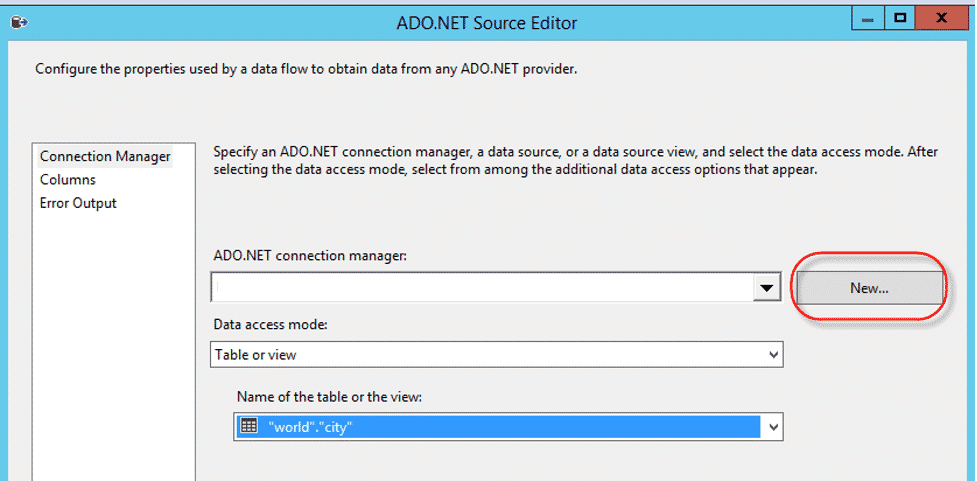
- To create a new ADO.NET connection, click on the “New” button.
- This will redirect you to the Connection Manager window. It will ask for the following parameters: Provider, Server Name, User Name, Password, and Database. For Provider, select the “.Net Providers\MySQL Data Provider” option and for the rest of the parameters, enter the MySQL Server details. Once done, click on the “Connect” button.
- Now, under Data Access Mode, select the “Table and View” option, and under Name of the table or the view, select the “‘Database_name’.‘Table_name’” option.
- Once done, click on the “Preview” button. This will throw an error as shown in the image below.
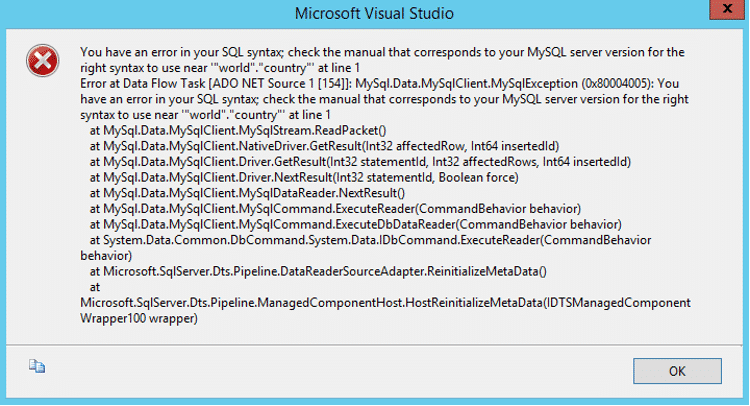
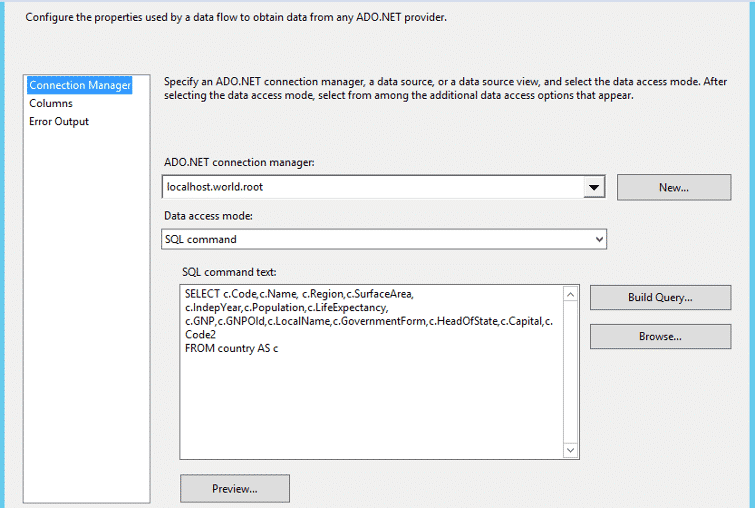
- The error is related to the ENUM compatibility issue that was discussed earlier. To solve this, go to the “Data Access” mode, select “SQL Command” to run a SELECT statement and make sure to exclude the column of data type ENUM as shown in the image below.
Step 3: Map the Source and Destination Columns
Follow the steps below to Map the source and destination columns:
- Add SQL Server Destination task to the design pane. Join the ADO NET Source that you created previously to the SQL Server Destination.
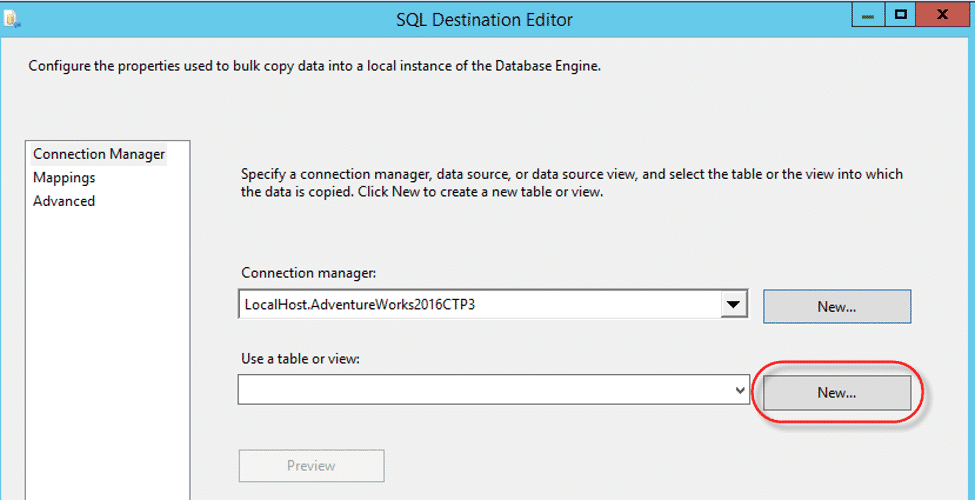
- Open SQL Server Destination, then click on the “New” button.
- This will open up the Connection Manager window. In “Provider”, select the “Native OLD DB\SQL Server Native Client” option and under “Server Name”, enter the SQL Server name. In “Add or choose a Database Name”, select the destination location. Once done, click on the “Connect” button.
- Create a new table by clicking on the “New” button as shown in the image below.
NOTE: You can modify the table and column names as per your requirements. Click on the “OK” button, after making the necessary modifications.
- Click on the “Mappings” page from the left panel to map your source column with the destination columns.
NOTE: If the source and destination columns have the same names, they will map automatically. Else, you will have to map them manually. - Map the columns and then click on the “OK” button.
- Now, click on the “Start” button to start importing data.
That’s it! You have now successfully migrated MySQL Tables to SQL Server.
Conclusion
This article introduces you to MySQL and SQL Server. Furthermore, it also provides a comprehensive step-by-step guide for migrating MySQL Tables to SQL Server.
Angela Spearman is a journalist at EzineMark who enjoys writing about the latest trending technology and business news.

